
前言
本文是续接上一篇文章《Proxmox VE支持RM520N 5G模块》,主要讲述了网络相关配置。
由于Proxmox VE 8使用的内核版本较新,与RM520N的驱动所支持的版本相差过远,而最新的一次更新后导致出现了无法使用IPV6的问题,为此,我只能将PVE更换为PVE 7.4-1版本,本文也是基于PVE 7.4-1进行的编写。
有两处说明再次更正一下:
1.Quectel_Linux_Android_QMI_WWAN_Driver_V1.2.6中的编译错误,出现在PVE8(内核6.x版本),而PVE7(内核5.x)版本中不存在。
2.busybox的脚本文件examples/udhcp/simple.script,在PVE8中是复制并重命名到/usr/share/udhcpc/default.script,而在PVE7中是复制并重命名到/etc/udhcpc/default.script。可以通过命令查看,如下所示:
root@zy-pve:~# busybox udhcpc -h
udhcpc: option requires an argument -- 'h'
BusyBox v1.30.1 (Debian 1:1.30.1-6+b3) multi-call binary.

Usage: udhcpc [-fbqRB] [-a[MSEC]] [-t N] [-T SEC] [-A SEC/-n]
        [-i IFACE] [-s PROG] [-p PIDFILE]
        [-oC] [-r IP] [-V VENDOR] [-F NAME] [-x OPT:VAL]... [-O OPT]...

        -i IFACE        Interface to use (default eth0)
        -s PROG         Run PROG at DHCP events (default /etc/udhcpc/default.script)
        -p FILE         Create pidfile
        -B              Request broadcast replies
        -t N            Send up to N discover packets (default 3)
        -T SEC          Pause between packets (default 3)
        -A SEC          Wait if lease is not obtained (default 20)
        -n              Exit if lease is not obtained
        -q              Exit after obtaining lease
        -R              Release IP on exit
        -f              Run in foreground
        -b              Background if lease is not obtained
        -S              Log to syslog too
        -a[MSEC]        Validate offered address with ARP ping
        -r IP           Request this IP address
        -o              Don't request any options (unless -O is given)
        -O OPT          Request option OPT from server (cumulative)
        -x OPT:VAL      Include option OPT in sent packets (cumulative)
                        Examples of string, numeric, and hex byte opts:
                        -x hostname:bbox - option 12
                        -x lease:3600 - option 51 (lease time)
                        -x 0x3d:0100BEEFC0FFEE - option 61 (client id)
                        -x 14:'"dumpfile"' - option 14 (shell-quoted)
        -F NAME         Ask server to update DNS mapping for NAME
        -V VENDOR       Vendor identifier (default 'udhcp VERSION')
        -C              Don't send MAC as client identifier
Signals:
        USR1    Renew lease
        USR2    Release lease
3./etc/udhcpc/default.script: 52: arithmetic expression: expecting primary: "metric++" 问题
拨号过程中会提示该问题,会导致无法上网。解决办法如下:
ln -sf /bin/bash /bin/sh具体说明可以参考文章 https://blog.csdn.net/fhy00229390/article/details/108666621和https://www.cnblogs.com/huangcx6/p/16362702.html
4. 开机自启动拨号,会出现IPv4无法上网的问题
原因是udhcpc无法识别到route命令路径。修改/etc/udhcpc/default.script,如下:
把
route add default gw $i dev $interface metric $((metric++))修改成
/sbin/route add default gw $i dev $interface metric $((metric++))PVE配置
interfaces配置
编辑/etc/network/interfaces,如下所示。
auto lo
iface lo inet loopback

iface enp1s0 inet manual

iface wwan0 inet manual

iface enp2s0 inet manual

iface eno1 inet manual

iface enp4s0 inet manual

auto vmbr0
iface vmbr0 inet static
        address 192.168.1.1/24
        bridge-ports enp1s0
        bridge-stp off
        bridge-fd 0
        post-up   iptables -t nat -A POSTROUTING -s 192.168.1.0/24 -o wwan0 -j MASQUERADE
        post-down iptables -t nat -D POSTROUTING -s 192.168.1.0/24 -o wwan0 -j MASQUERADE
        #post-up   /usr/bin/bash /root/tools/post-up.sh
        #post-down /usr/bin/bash /root/tools/post-down.sh

iface vmbr0 inet6 static
        address 2001:db8:0:1::1/64
        bridge-ports enp1s0
        bridge-stp off
        bridge-fd 0
        post-up   ip6tables -t nat -A POSTROUTING -s 2001:db8:0:1::0/24 -o wwan0 -j MASQUERADE
        post-down ip6tables -t nat -D POSTROUTING -s 2001:db8:0:1::0/24 -o wwan0 -j MASQUERADE
网桥vmbr0设置ipv4地址为192.168.1.1,ipv6地址为2001:db8:0:1::1。
不能设置网关!!!
不能设置网关!!!
不能设置网关!!!
post-up为网卡启动时执行,iptables和ip6tables添加网卡转发规则:网段192.168.1.0/24的包转发到wwan0,网段2001:db8:0:1::0/64的包转发到wwan0。
iptables -t nat -A POSTROUTING -s 192.168.1.0/24 -o wwan0 -j MASQUERADE
ip6tables -t nat -A POSTROUTING -s 2001:db8:0:1::0/24 -o wwan0 -j MASQUERADE
post-down为网卡关闭时执行,用于删除转发规则。
iptables -t nat -D POSTROUTING -s 192.168.1.0/24 -o wwan0 -j MASQUERADE
ip6tables -t nat -D POSTROUTING -s 2001:db8:0:1::0/24 -o wwan0 -j MASQUERADE
wwan0为5G模块网卡名称,一般是固定的格式wwanX。
如果5G网卡名称不固定,例如采用的是`enx+MAC`的形式,每次上下电MAC地址会发生变化,从而导致网卡名称发生变化。可以采用如下方式:
post-up   /usr/bin/bash /root/tools/post-up.sh
post-down /usr/bin/bash /root/tools/post-down.sh
post-up和post-down执行一段脚本来达到添加转发规则和删除转发规则的目的。
查找所有网卡中名称为enx开头的网卡,添加转发规则,post-up.sh示例如下:
#!/bin/bash

# 获取所有网卡接口名
interfaces=$(ls /sys/class/net)

for interface in $interfaces
do
    if [[ $interface == "enx"* ]]; then
       iptables -t nat -A POSTROUTING -s 192.168.1.0/24 -o $interface -j MASQUERADE
       ip6tables -t nat -A POSTROUTING -s 2001:db8:0:1::0/64 -o $interface -j MASQUERADE
    fi
done
查找所有网卡中名称为enx开头的网卡,删除转发规则,post-down.sh示例如下:
#!/bin/bash

# 获取所有网卡接口名
interfaces=$(ls /sys/class/net)

for interface in $interfaces
do
    if [[ $interface == "enx"* ]]; then
       iptables -t nat -D POSTROUTING -s 192.168.1.0/24 -o $interface -j MASQUERADE
       ip6tables -t nat -D POSTROUTING -s 2001:db8:0:1::0/64 -o $interface -j MASQUERADE
    fi
done
使能转发
编辑 /etc/sysctl.conf,取消net.ipv4.ip_forward=1和net.ipv6.conf.all.forwarding=1的注释,保存后执行sysctl -p。
# Uncomment the next line to enable packet forwarding for IPv4
net.ipv4.ip_forward=1

# Uncomment the next line to enable packet forwarding for IPv6
#  Enabling this option disables Stateless Address Autoconfiguration
#  based on Router Advertisements for this host
net.ipv6.conf.all.forwarding=1
安装ISC-DHCP-Server
apt install isc-dhcp-server安装完成后由于没有进行配置,会提示isc-dhcp-server服务启动失败。当配置完成后,重启服务,便不会提示失败。
dhcp配置
1. 指定监听接口
编辑/etc/default/isc-dhcp-server。
INTERFACESv4="vmbr0"
INTERFACESv6="vmbr0"
vmbr0为网口0(enp1s0)的网桥。
2. ipv4配置
编辑/etc/dhcp/dhcpd.conf
# option definitions common to all supported networks...
#option domain-name "example.org";
option domain-name-servers 192.168.1.3;

subnet 192.168.1.0 netmask 255.255.255.0 {
    option routers 192.168.1.3;
    option subnet-mask 255.255.255.0;
    option domain-name-servers 192.168.1.3;

    range 192.168.1.32 192.168.1.254;
}
其中192.168.1.3为虚拟机openwrt的IP,将网关和DNS都设置为openwrt的IP,用于实现pve与openwrt之间的网关互指。
range可以指定dhcp分配的地址范围。
3. ipv6配置
#
# Global definitions for name server address(es) and domain search list
option dhcp6.name-servers 2001:db8:0:1::3;
#option dhcp6.domain-search "test.example.com","example.com";

# The subnet where the server is attached
#  (i.e., the server has an address in this subnet)
subnet6 2001:db8:0:1::/64 {
    # Two addresses available to clients
    #  (the third client should get NoAddrsAvail)
    range6 2001:db8:0:1::20 2001:db8:0:1::fe;

    # Use the whole /64 prefix for temporary addresses
    #  (i.e., direct application of RFC 4941)
    range6 2001:db8:0:1::/64 temporary;

    # Some /64 prefixes available for Prefix Delegation (RFC 3633)
  prefix6 2001:db8:0:1:2:: 2001:db8:0:1:fff:: /80;

  option dhcp6.name-servers 2001:db8:0:1::3;
}
range6指定地址范围。
option dhcp6.name-servers指定DNS。
4. 重启服务
/etc/init.d/isc-dhcp-server restartOpenWRT配置
安装
OpenWrt系统安装过程请自行查询。
接口配置
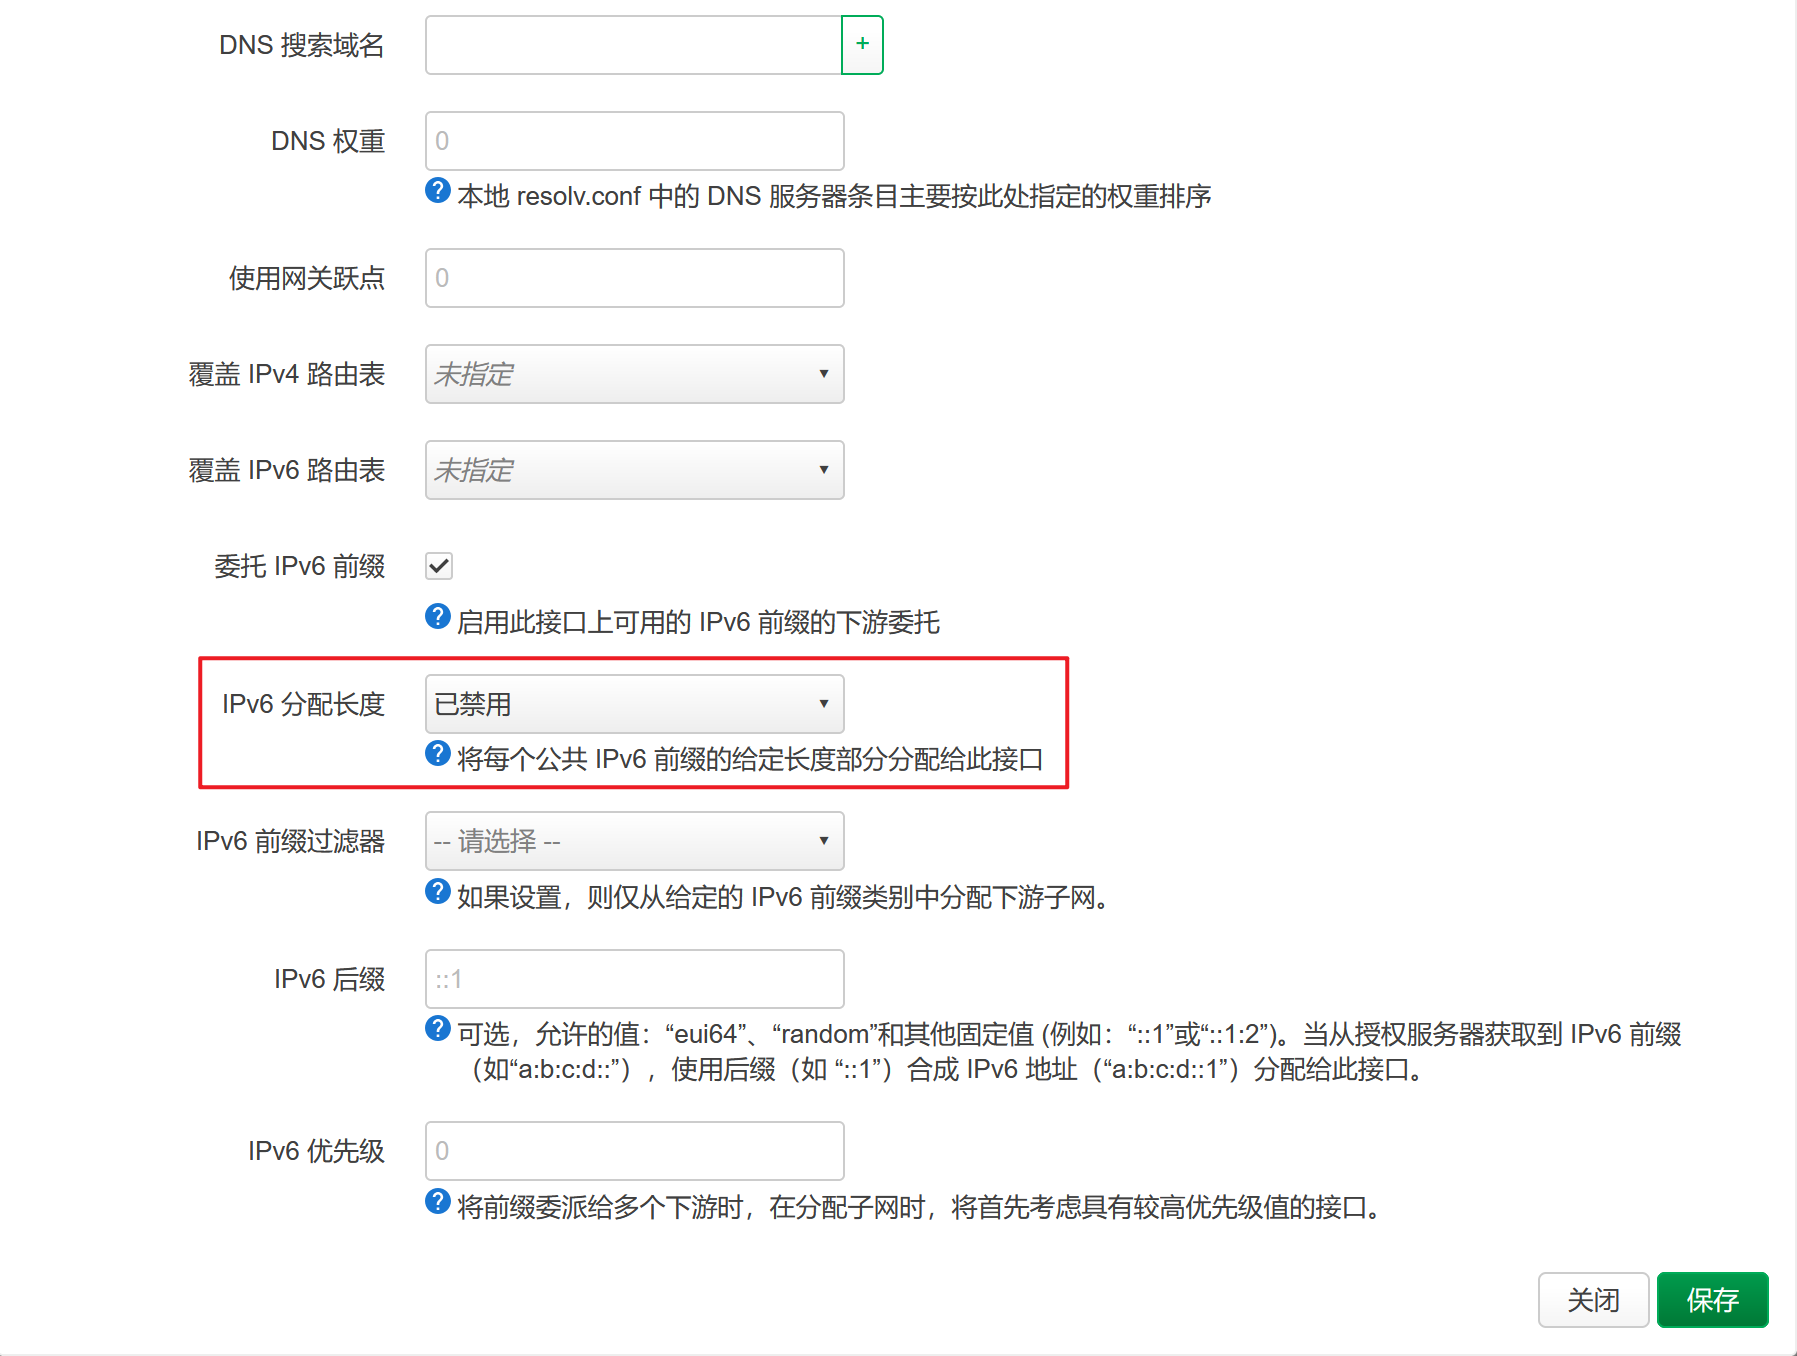
1. 禁用接口lan的IPV6分配长度,目的是关闭自动IPV6分配,这样可以配置静态IPV6。接口》lan》高级设置》IPv6分配长度,选择已禁用。
2. 回到常规设置界面,便可以看到出现了IPV6的地址设置选项。接口》lan》常规设置按照图中设置即可。

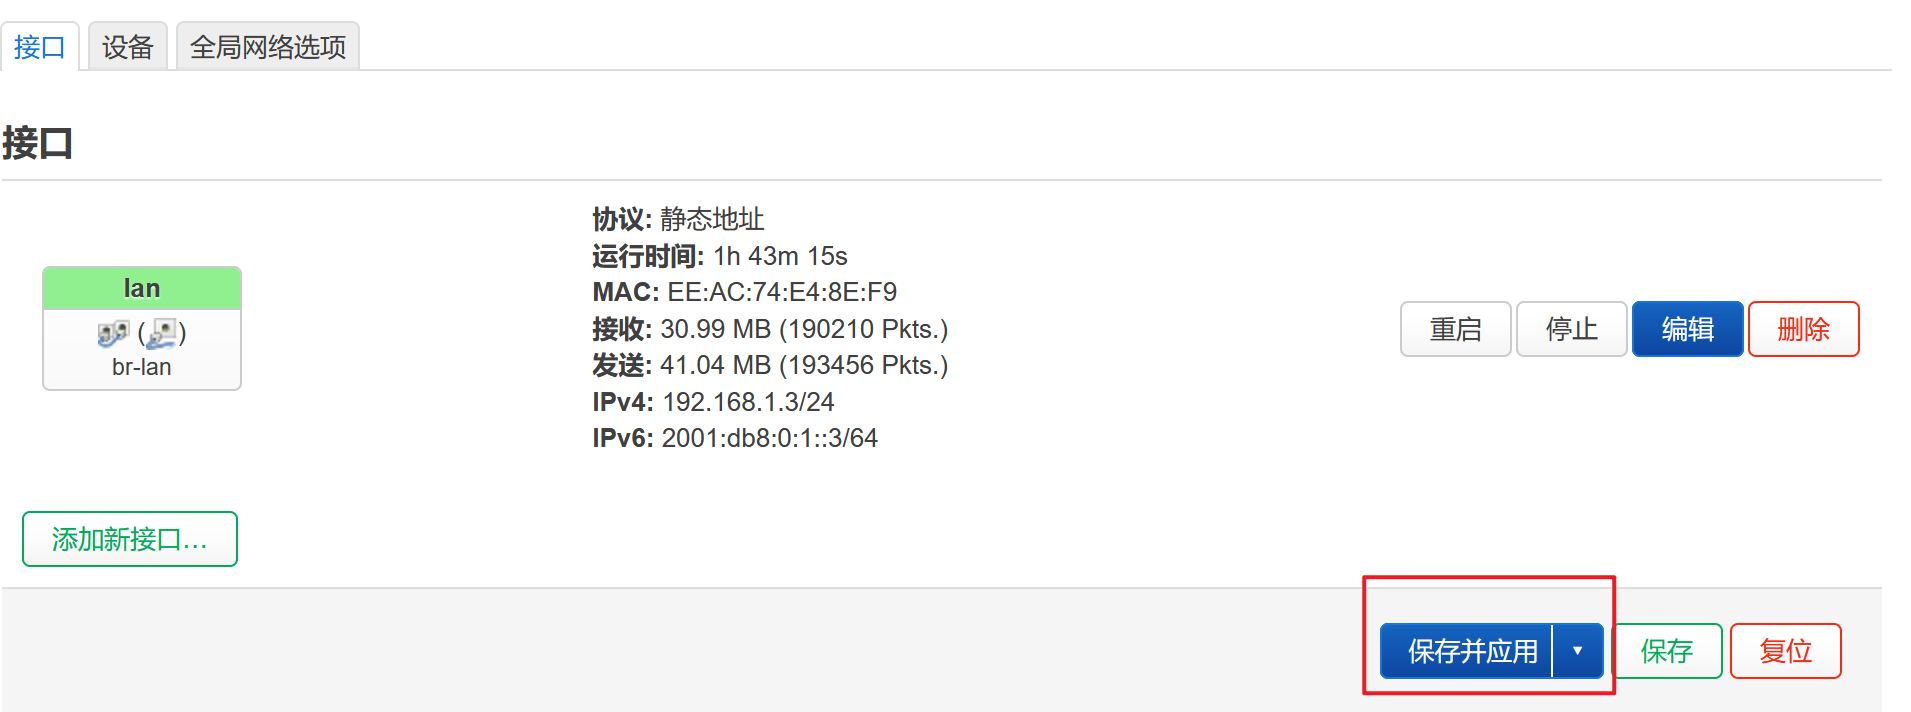
ipv4地址设置为192.168.1.3,该值为pve dhcp服务器网关地址。ipv4网关设置为192.168.1.1,该值为pve vmbr0(网桥0)ip地址。
ipv6地址设置为2001:db8:0:1::3。ipv6网关设置为2001:db8:01::1,该值为pve vmbr0(网桥0)ip地址。
至此,pve与openwrt之间的网关互指完成,所有的数据流量都会走一遍openwrt,便于openwrt进行管理。
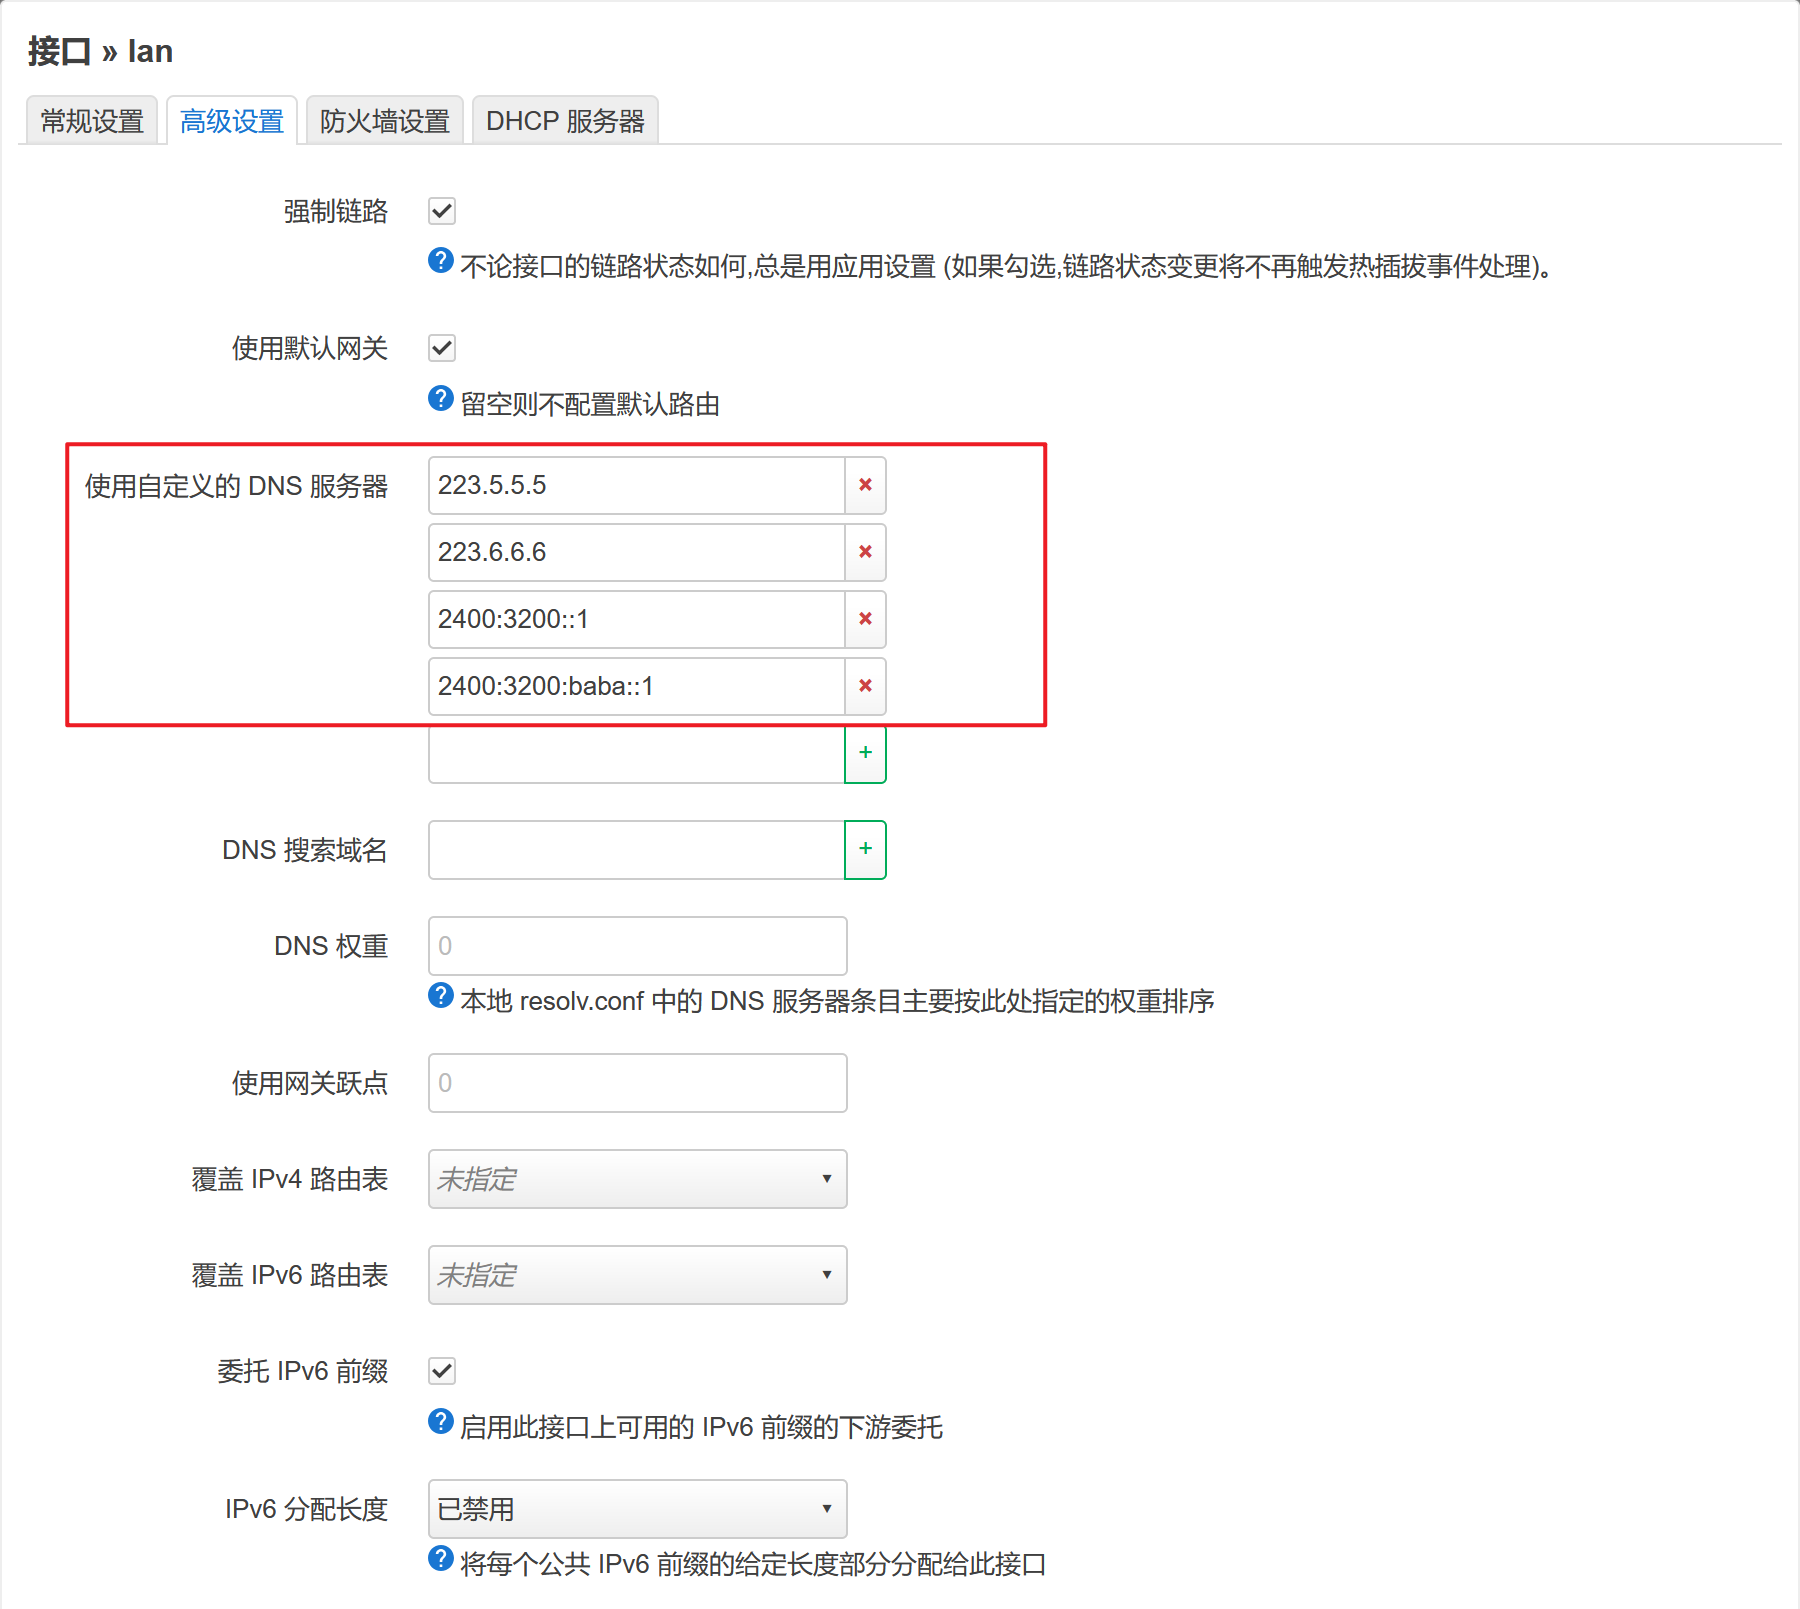
3. 设置DNS服务器。接口》lan》高级设置,需要同时设置IPV4和IPV6的DNS,如本文设置了阿里云的DNS。
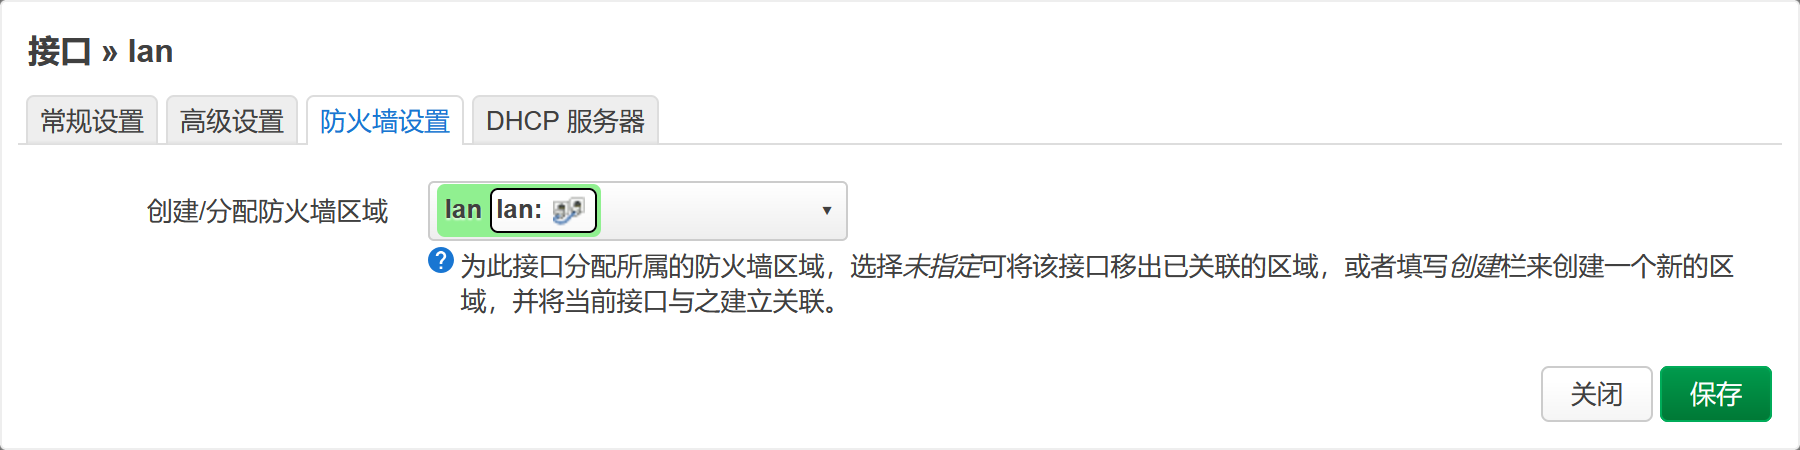
4. 防火墙设置。
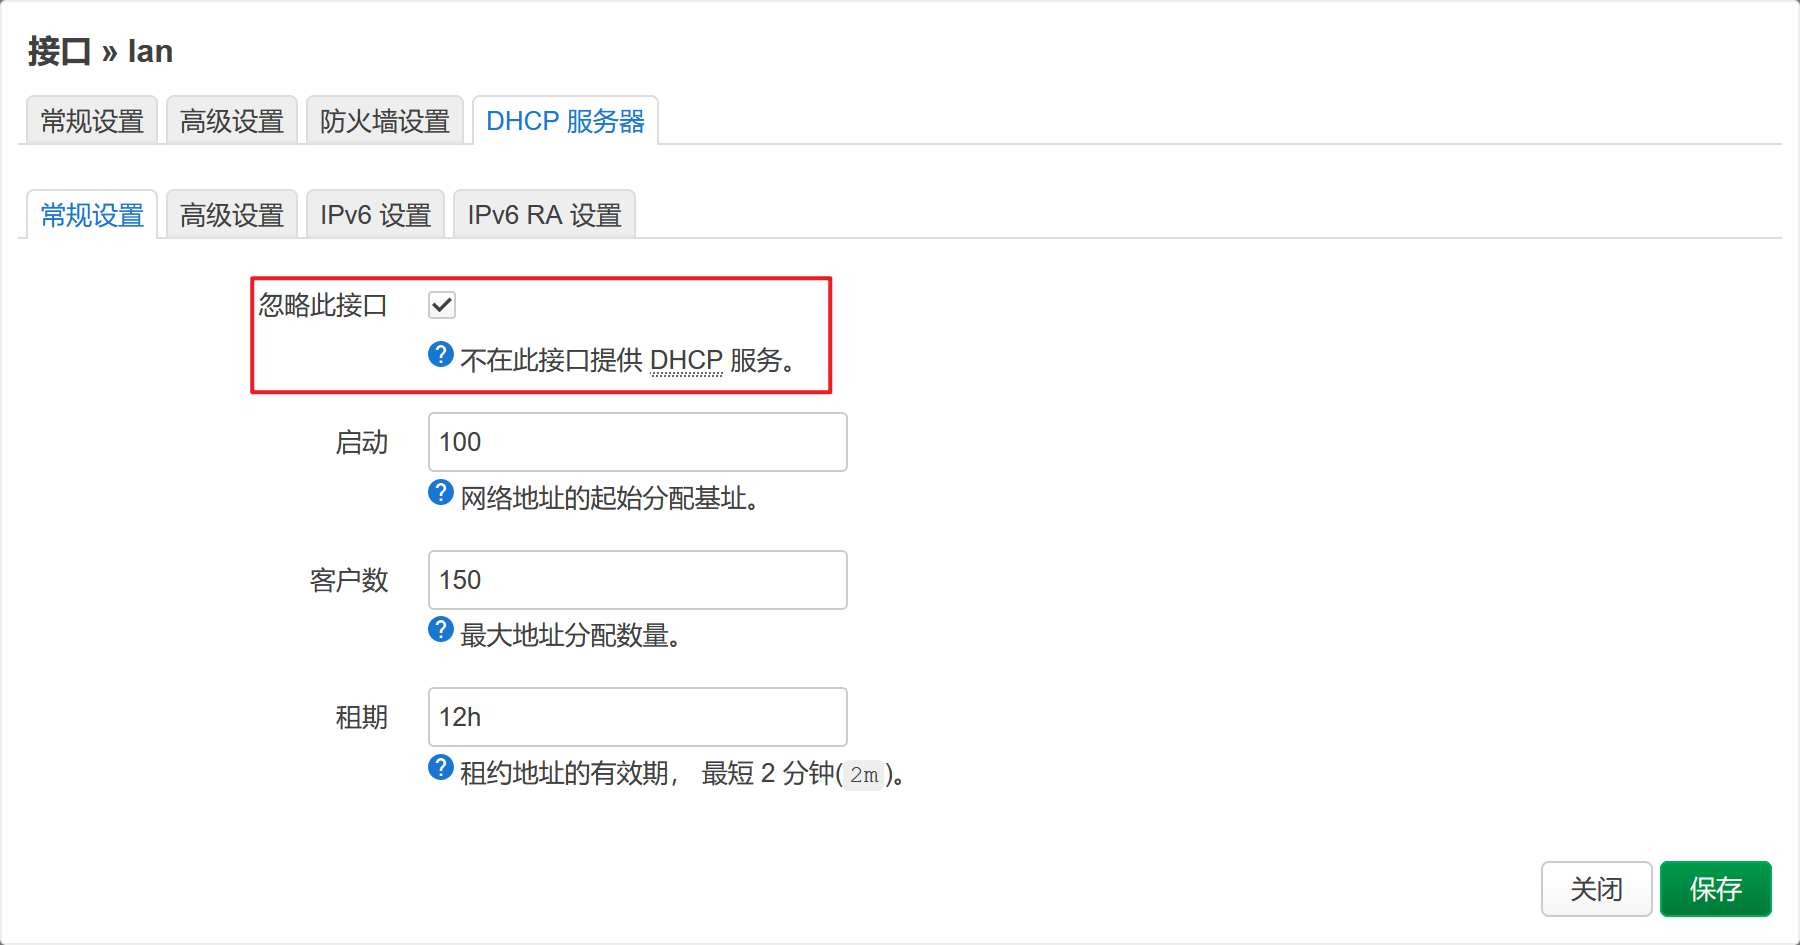
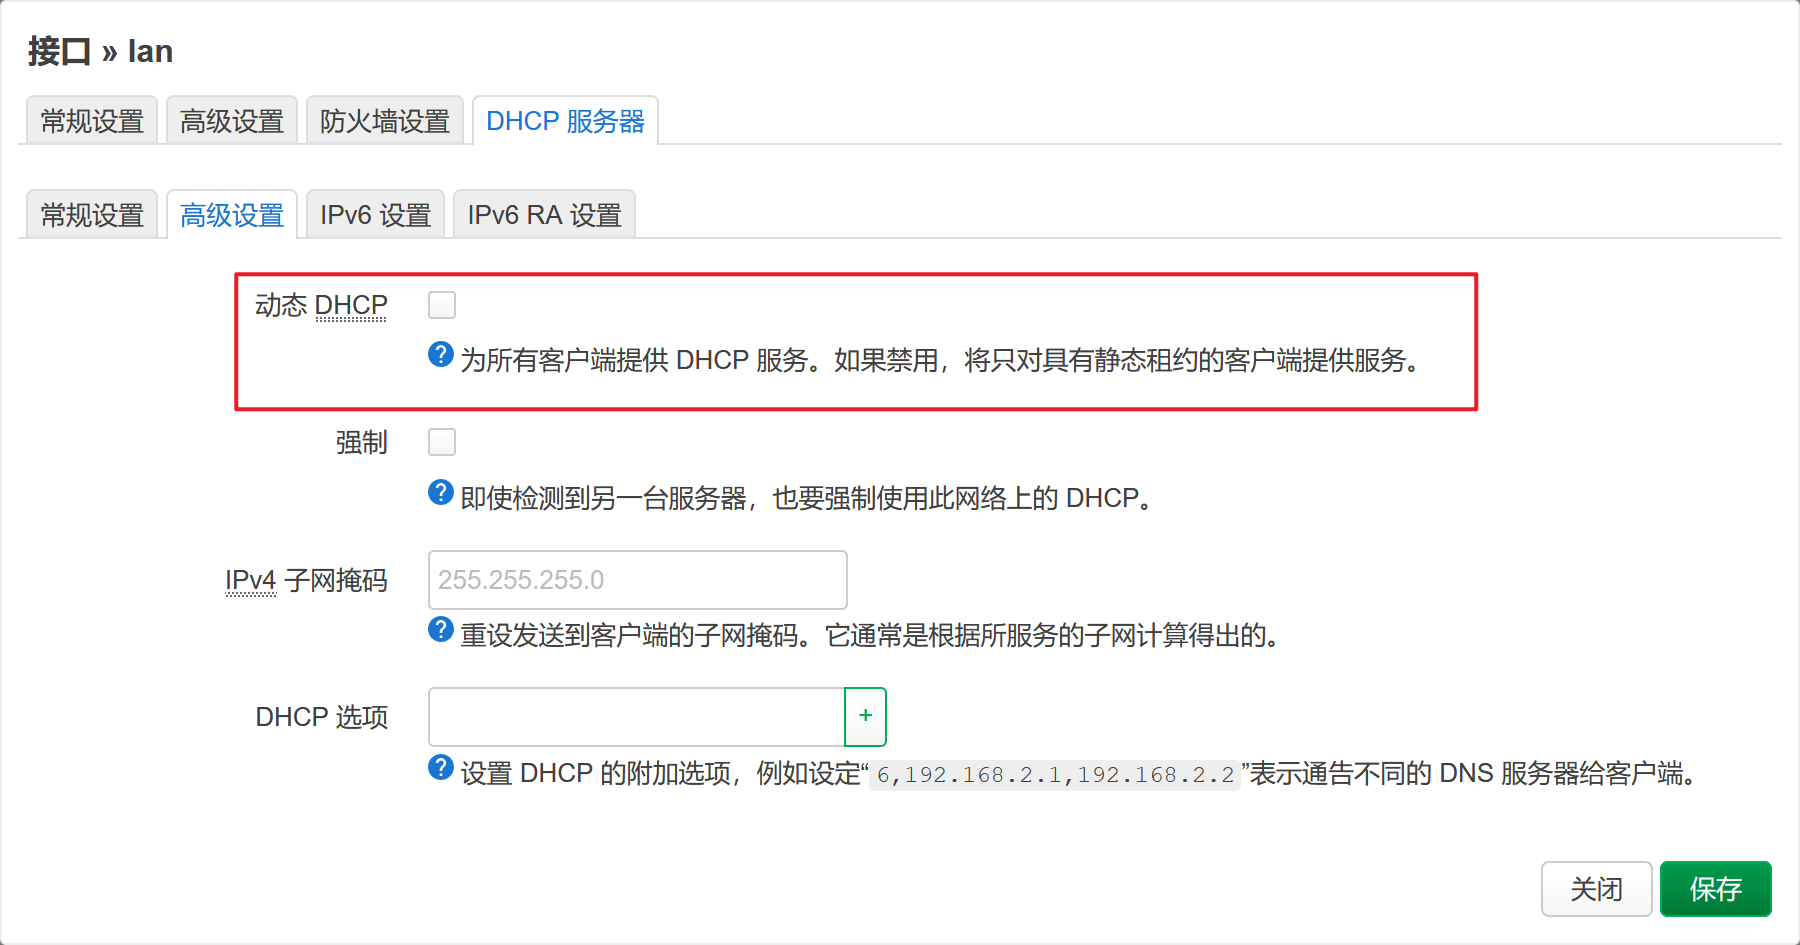
5. DHCP设置。接口》lan》DHCP服务器。
接口》lan》DHCP服务器》常规设置,勾选忽略此接口。
接口》lan》DHCP服务器》高级设置,去除动态DHCP勾选。
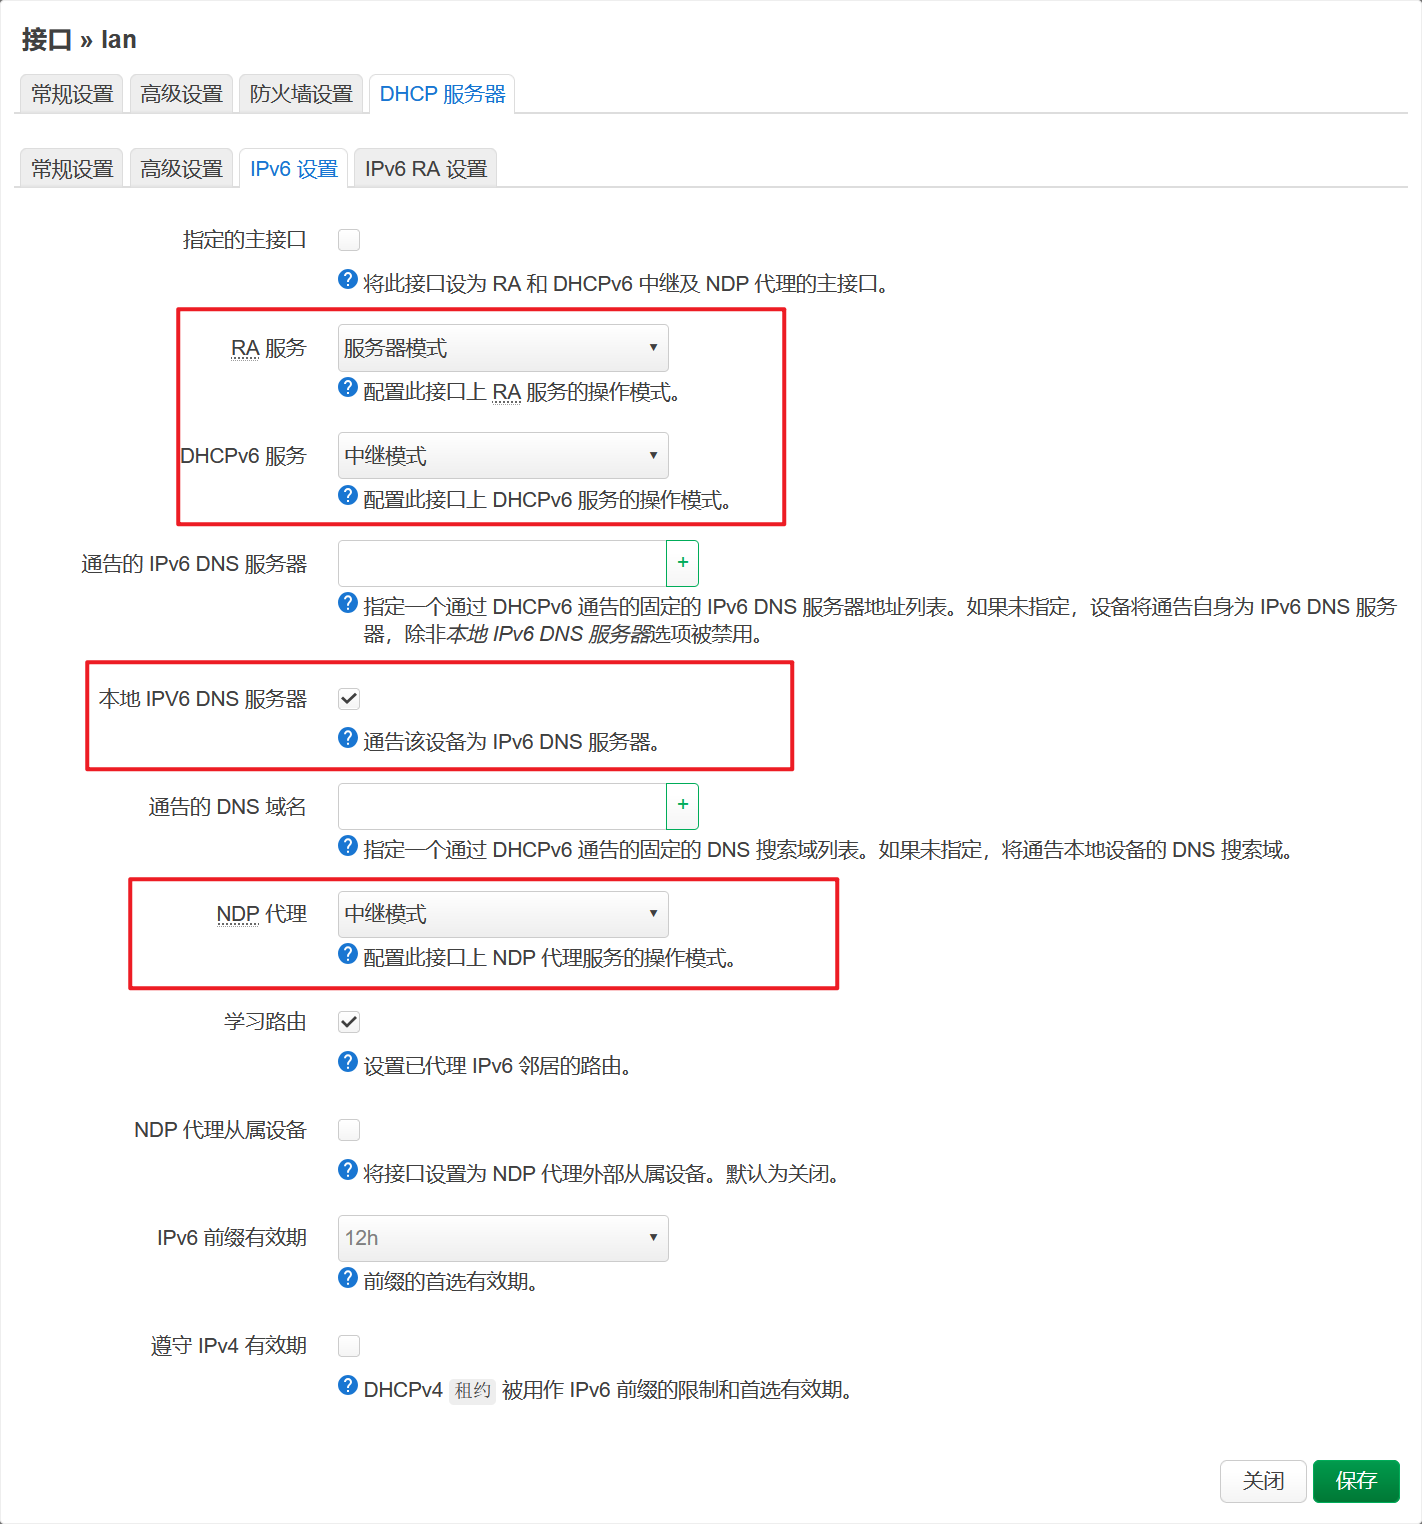
接口》lan》DHCP服务器》IPv6设置,RA服务选择服务器模式,DHCPv6服务选择中继模式,NDP代理选择中继模式。
接口》lan》DHCP服务器》IPv6 RA设置,默认路由器选择强制的。

至此,接口lan相关配置结束,如图所示为点击保存并应用。
外接路由器
J4125网口0可以插入路由器了,路由器配置为有线中继。
PC端WiFi接入后分配的地址,如下所示
无线局域网适配器 WLAN:

   连接特定的 DNS 后缀 . . . . . . . :
   描述. . . . . . . . . . . . . . . : Intel(R) Dual Band Wireless-AC 8275
   物理地址. . . . . . . . . . . . . : 4C-D1-A1-51-FB-DD
   DHCP 已启用 . . . . . . . . . . . : 是
   自动配置已启用. . . . . . . . . . : 是
   IPv6 地址 . . . . . . . . . . . . : 2001:db8:0:1:dd2a:e741:edcd:bb00(首选)
   临时 IPv6 地址. . . . . . . . . . : 2001:db8:0:1:8891:c5b1:8b85:8382(首选)
   本地链接 IPv6 地址. . . . . . . . : fe80::4979:911c:e2ed:5134%19(首选)
   IPv4 地址 . . . . . . . . . . . . : 192.168.1.166(首选)
   子网掩码  . . . . . . . . . . . . : 255.255.255.0
   获得租约的时间  . . . . . . . . . : 2024年9月26日 11:43:16
   租约过期的时间  . . . . . . . . . : 2024年9月26日 11:53:16
   默认网关. . . . . . . . . . . . . : fe80::ecac:74ff:fee4:8ef9%19
                                      192.168.1.3
   DHCP 服务器 . . . . . . . . . . . : 192.168.1.1
   DHCPv6 IAID . . . . . . . . . . . : 323801505
   DHCPv6 客户端 DUID  . . . . . . . : 00-01-00-01-2E-4F-90-6D-98-FC-84-E3-0E-AD
   DNS 服务器  . . . . . . . . . . . : 2001:db8:0:1::3
                                      192.168.1.3
                                      2001:db8:0:1::3
   TCPIP 上的 NetBIOS  . . . . . . . : 已启用
PC IPV4 Ping百度
C:\Users\Administrator>ping -4 www.baidu.com

正在 Ping www.a.shifen.com [39.156.66.14] 具有 32 字节的数据:
来自 39.156.66.14 的回复: 字节=32 时间=68ms TTL=50
来自 39.156.66.14 的回复: 字节=32 时间=96ms TTL=50
来自 39.156.66.14 的回复: 字节=32 时间=122ms TTL=50
来自 39.156.66.14 的回复: 字节=32 时间=64ms TTL=50

39.156.66.14 的 Ping 统计信息:
    数据包: 已发送 = 4,已接收 = 4,丢失 = 0 (0% 丢失),
往返行程的估计时间(以毫秒为单位):
    最短 = 64ms,最长 = 122ms,平均 = 87ms
PC IPV6 Ping百度
C:\Users\Administrator>ping -6 www.baidu.com

正在 Ping www.a.shifen.com [2409:8c00:6c21:104f:0:ff:b03f:3ae] 具有 32 字节的数据:
来自 2409:8c00:6c21:104f:0:ff:b03f:3ae 的回复: 时间=60ms
来自 2409:8c00:6c21:104f:0:ff:b03f:3ae 的回复: 时间=87ms
来自 2409:8c00:6c21:104f:0:ff:b03f:3ae 的回复: 时间=105ms
来自 2409:8c00:6c21:104f:0:ff:b03f:3ae 的回复: 时间=122ms

2409:8c00:6c21:104f:0:ff:b03f:3ae 的 Ping 统计信息:
    数据包: 已发送 = 4,已接收 = 4,丢失 = 0 (0% 丢失),
往返行程的估计时间(以毫秒为单位):
    最短 = 60ms,最长 = 122ms,平均 = 93ms